Back to Safety Center Main Menu
Publishing a Plan
Plans in Safety Center are often location or audience based. For example, you may want to have a separate plan for each of your campuses or locations, or create one plan for your staff and another for your response team.
Watch the Video Tutorial:

How to Publish a Plan
- First make sure you are logged into the FacilityDude Safety Center online portal: safetycenter.facilitydude.com
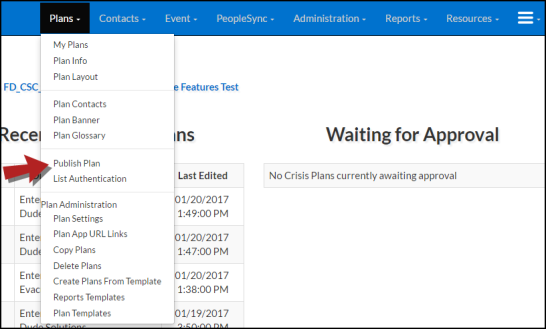
- Once you have opened the plan you would like to publish, click on the Plans tab and then click on Publish Plan. This brings you to the Publish Crisis Plan screen where you can select the security parameters for this plan.
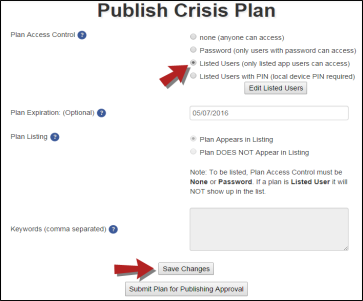
Security Settings
Safety Center allows you to select from six different levels of security for your plans. Here is a brief description of the available options:
1) Listed Plan, no Password
You can publish your plan where anyone with the Safety Center mobile app can download your plan from the Add a Plan screen.
- Select None in the Plan Access Control menu.
- Select Plan Appears in Listing under Plan Listing.
2) Listed Plan but Password Protected
You can publish your plan as a "Password" plan whereby only the users with the password can access the plan.
- Select Password in the Plan Access Control menu.
- Set the password.
- Select Plan Appears in Listing under Plan Listing. This will ensure the plan is still visible on the Add a Plan screen.
3) Unlisted and Password Protected
You can publish a plan that is password protected and does not appear in the Add a Plan screen.
- Select Password in the Plan Access Control menu.
- Set the password.
- Select Plan DOES NOT Appear in Listing under Plan Listing.
- Enter Keywords that will be used in the search field of the Add a Plan screen within the mobile app. You can enter multiple keywords for your plan. Separate each keyword entry with a comma. Users will need to know at least one of these keywords to find your plan and will need the password to download it to their device. Keywords are case sensitive.
4) Unlisted, Keyword Association Only
You can publish a plan that is not password protected and does not appear in the Add a Plan screen.
- Select None in the Plan Access Control menu.
- Select Plan DOES NOT Appear in Listing under Plan Listing.
- Enter Keywords that will be used in the search field of the Add a Plan screen within the mobile app. You can enter multiple keywords for your plan. Separate each keyword entry with a comma. Users will need to know at least one of these keywords to find your plan and will need the password to download it to their device. Keywords are case sensitive.
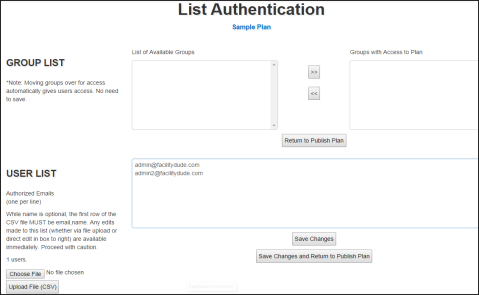
5) Authorized User List
You can publish your plan with the "Authorized User List" option. Only users that you have listed will have access to the plan. Mobile App Users will have to verify their email address before they are able to access the plan. *Note: The Authorized User List option also allows the Plan Administrator to remotely wipe or delete the plan from a specific user's phone. Once the user's email address is removed from the User List within the Online Portal, the plan will automatically delete from the user's device.
- Select Listed Users in the Plan Access Control menu and click Save Changes.
- Click the Edit Listed Users button to create your authorized user list by selecting an available group list, uploading a list of email addresses, or entering each one manually. If you create the list manually, be sure to enter one email address per line in a list format.
Watch the Video Tutorial:
- Click Save Changes and Return to Publish Plan.
|
|
6) Authorized User List with PIN access
This is the highest level of security for your plans and is set up in the same way as the regular Authorized User List. However, the end user will have to set a 4 digit passcode on their mobile device that they are required to enter every time they access the plan.
- Select Listed Users with PIN in the Plan Access Control menu and click Save Changes.
- Click the Edit Listed Users button to create your authorized user list by selecting an available group list, uploading a list of email addresses, or entering each one manually. If you create the list manually, be sure to enter one email address per line in a list format.
- Click Save Changes and Return to Publish Plan.
Expiring Plans
Plan Administrators can place an expiration date on any plan. Once a plan has passed the expiration date, the plan is no longer available for downloading. This is a great option for those plans that are seasonally based or event driven.
- Simply enter in a date in the Plan Expiration field.

Click Save Changes at the bottom of the screen after you make any selection on the Publish Crisis Plan screen.
Publishing the Plan
- After saving the security settings for your plan, click Submit Plan for Publishing Approval at the bottom of the screen.
- This will take you to a view of the entire plan. You can scroll through to make sure everything is correct.
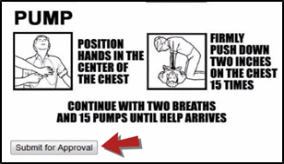
- At the top of the screen, you can click the Jump Right to Submit for Approval link to jump to the end of the plan.
- Click the Submit for Approval button at the end of the plan.
|
|
|
- The plan will now appear on the Home screen in the Waiting for Approval section. The administrator with final approval rights can now open the plan to view it.
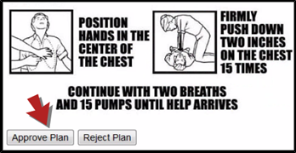
- At the top of the screen, you can click the Jump Right to Approve or Reject Plan link to jump to the end of the plan.
- Click Approve Plan to publish the plan and make it available for users to download onto their mobile devices.

|
|
- Be sure to download and open your published plan on your smartphone to make sure that each page looks the way you intended.
